Author: Alexander Kokoshyn
Posted: 1/5/2006 5:09:00 PM
Sitecore versions: Valid for versions 5.1.1, 5.2, 5.3.
It is possible to put renderings in the Rich Text Editor and process those entries at runtime. This may be useful when we need to embed glossary terms, stock symbols, and so on in the WYSIWYG editor so that they pop up new windows, show or hide divs, etc.
The example below shows how to create an XSLT extension that parses the output of an HTML field and a Text field.
- Create an XSLT extension.
Use the source code below:using System.Web.UI;
namespace Sitecore.XslHelperEx
{
public class VisualXslExtensions
{
public string parseHTML(string sHTML)
{
System.Web.UI.Page pg = new System.Web.UI.Page();
// Note: please add the line below only if you use Sitecore 5.3
pg.AppRelativeVirtualPath = "/";
// As long as HTML does not have any namespace definitions
// we'll need to add these ones.
// Add the sc namespace
// (you may also add additional ones)
sHTML = @"<%@ Register TagPrefix=""sc"" Namespace=""Sitecore.Web.UI.WebControls"" assembly=""Sitecore.Kernel"" %>" + sHTML;
// Parse the string into a Control on the Web Forms page.
System.Web.UI.Control control = pg.ParseControl(sHTML);
// Turn the Control above into HTML
string sFinalHTML = Sitecore.Web.HtmlUtil.RenderControl(control);
return sFinalHTML;
}
}
} -
Modify the web.config by defining the following extension:
<extension mode="on" type="Sitecore.XslHelperEx.VisualXslExtensions, VisualXslExtensionsV5" namespace="http://www.sitecore.net/scex" singleInstance="true" />
- Change the default 'document.xslt' rendering.
- Add the namespace used in the xsl style sheet definition:<xsl:stylesheet version="1.0"
xmlns:xsl="http://www.w3.org/1999/XSL/Transform"
xmlns:sc="http://www.sitecore.net/sc"
xmlns:dot="http://www.sitecore.net/dot"
xmlns:item="http://www.sitecore.net/item"
xmlns:scex="http://www.sitecore.net/scex"
exclude-result-prefixes="dot sc scex"> Add the following definition to the main template of the Document rendering:
<xsl:template match="*" mode="main">
<sc:dot>
<h2><sc:text field="title"/></h2>
<xsl:value-of select="scex:parseHTML(sc:fld('text',.))" disable-output-escaping="yes" />
<xsl:value-of select="scex:parseHTML(sc:fld('title',.))" disable-output-escaping="yes" />
</sc:dot>
</xsl:template>
- Create a sample XSLT to use in HTML field:
Create a simple XSLT rendering named 'search' and add the following code to the parameters section and in the main method:
<xsl:param name="searchterm" select="''" />
Add the following definition to the main template of the rendering:
<xsl:template match="*" mode="main">
<xsl:variable name="results" select="sc:descendants(/item/item[@key='content'])/self::item[starts-with(@key, $searchterm)]" />
<strong>
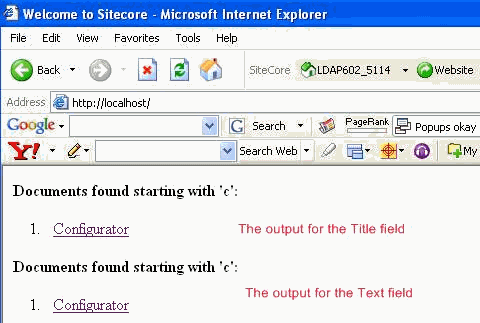
Documents found starting with '<xsl:value-of select="$searchterm" />':
<br />
</strong>
<ol>
<xsl:for-each select="$results">
<li><sc:link><xsl:value-of select="@name" /></sc:link></li>
</xsl:for-each>
</ol>
</xsl:template>
-
Add the following values to the Title or Text fields.
-
- Insert the value to the html field in the HTML view:
- Insert the value to the text field:

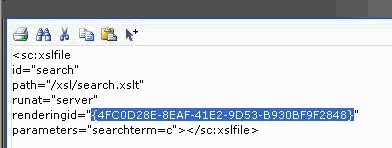
Make sure that the rendering's ID is valid.
- Insert the value to the html field in the HTML view:
- Save and publish.
As a result, the following can be observed on the front-end: